This post may contain affiliate links, view our disclosure.
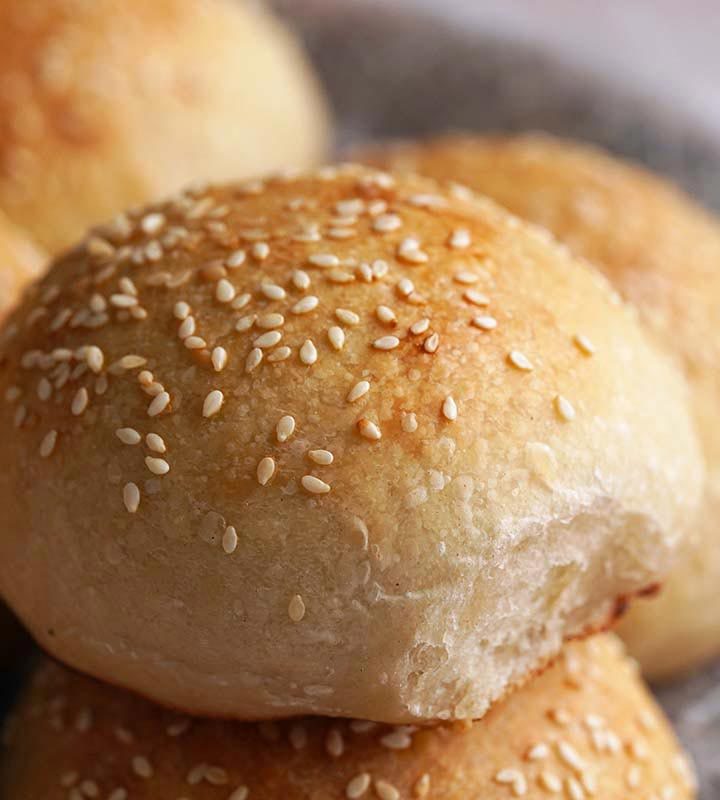
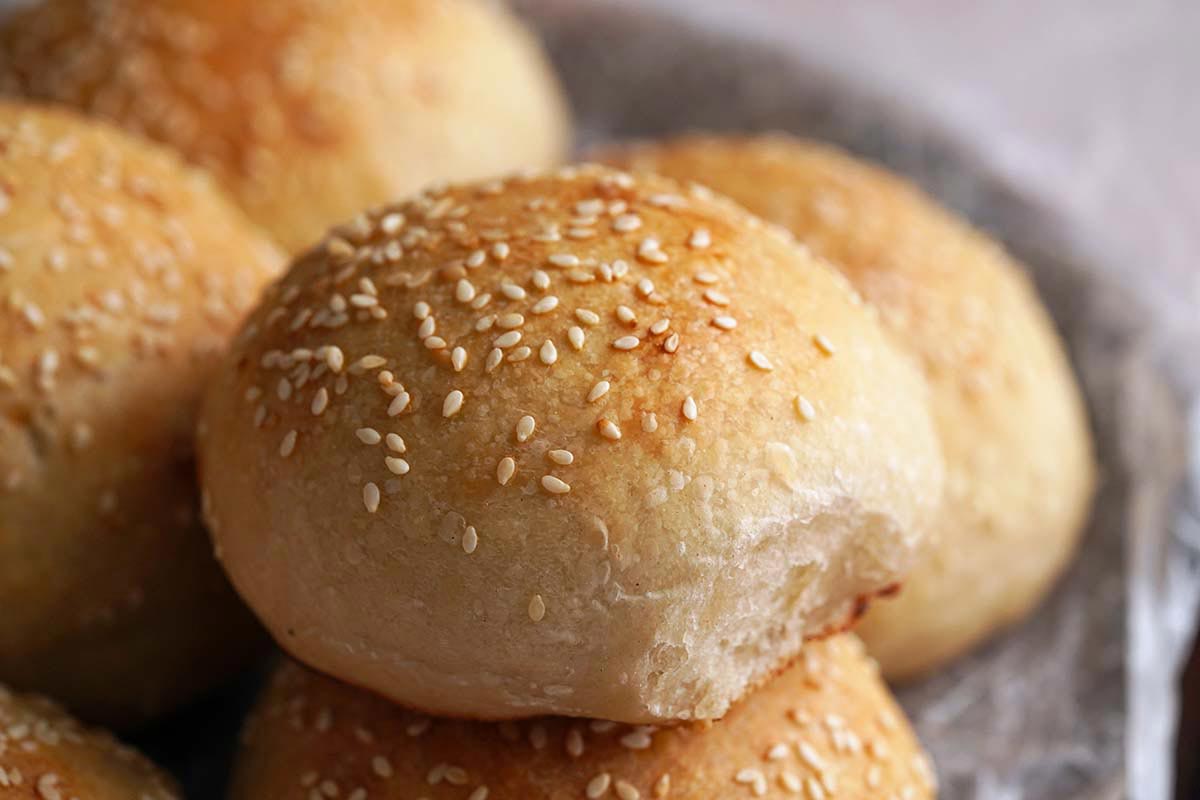
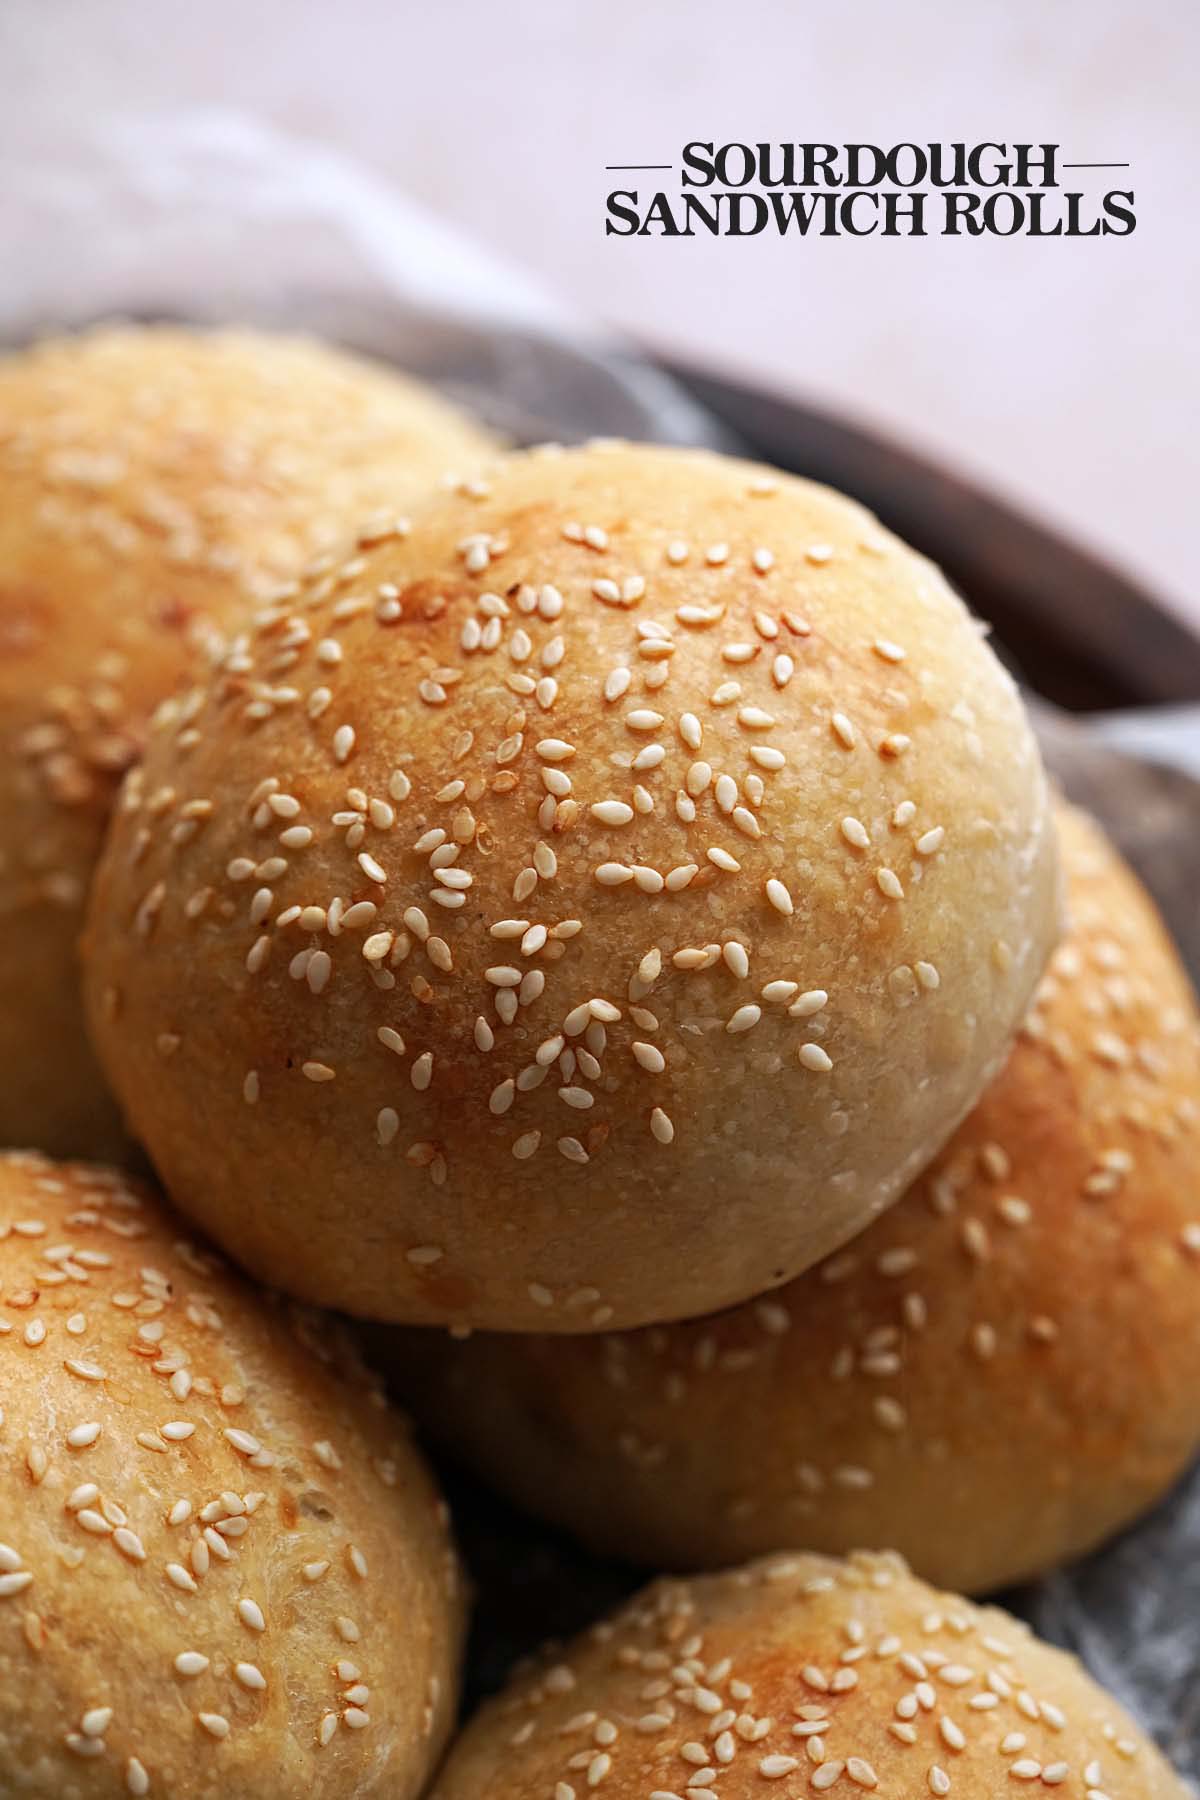
Sourdough sandwich rolls are soft and pillowy inside with a chewy crust, perfect for piling high with your favorite fillings. This recipe uses active sourdough starter, no commercial yeast in sight.
After learning how to bake sourdough bread, one of my favorite things to do has been experiment with it. I love a good sourdough sandwich, but with sourdough’s classic open crumb and ultra-crisp crust (both of which I love), this type of bread doesn’t always lend itself well to sandwiches. Enter these rolls!
How Are Sourdough Sandwich Rolls Different Than Regular Sourdough Bread?
Traditional sourdough bread is made with sourdough starter, flour, water, and salt – that’s it! Every time I think about it, the fact that those simple ingredients come together to make bread blows my mind. Baking truly is magic.
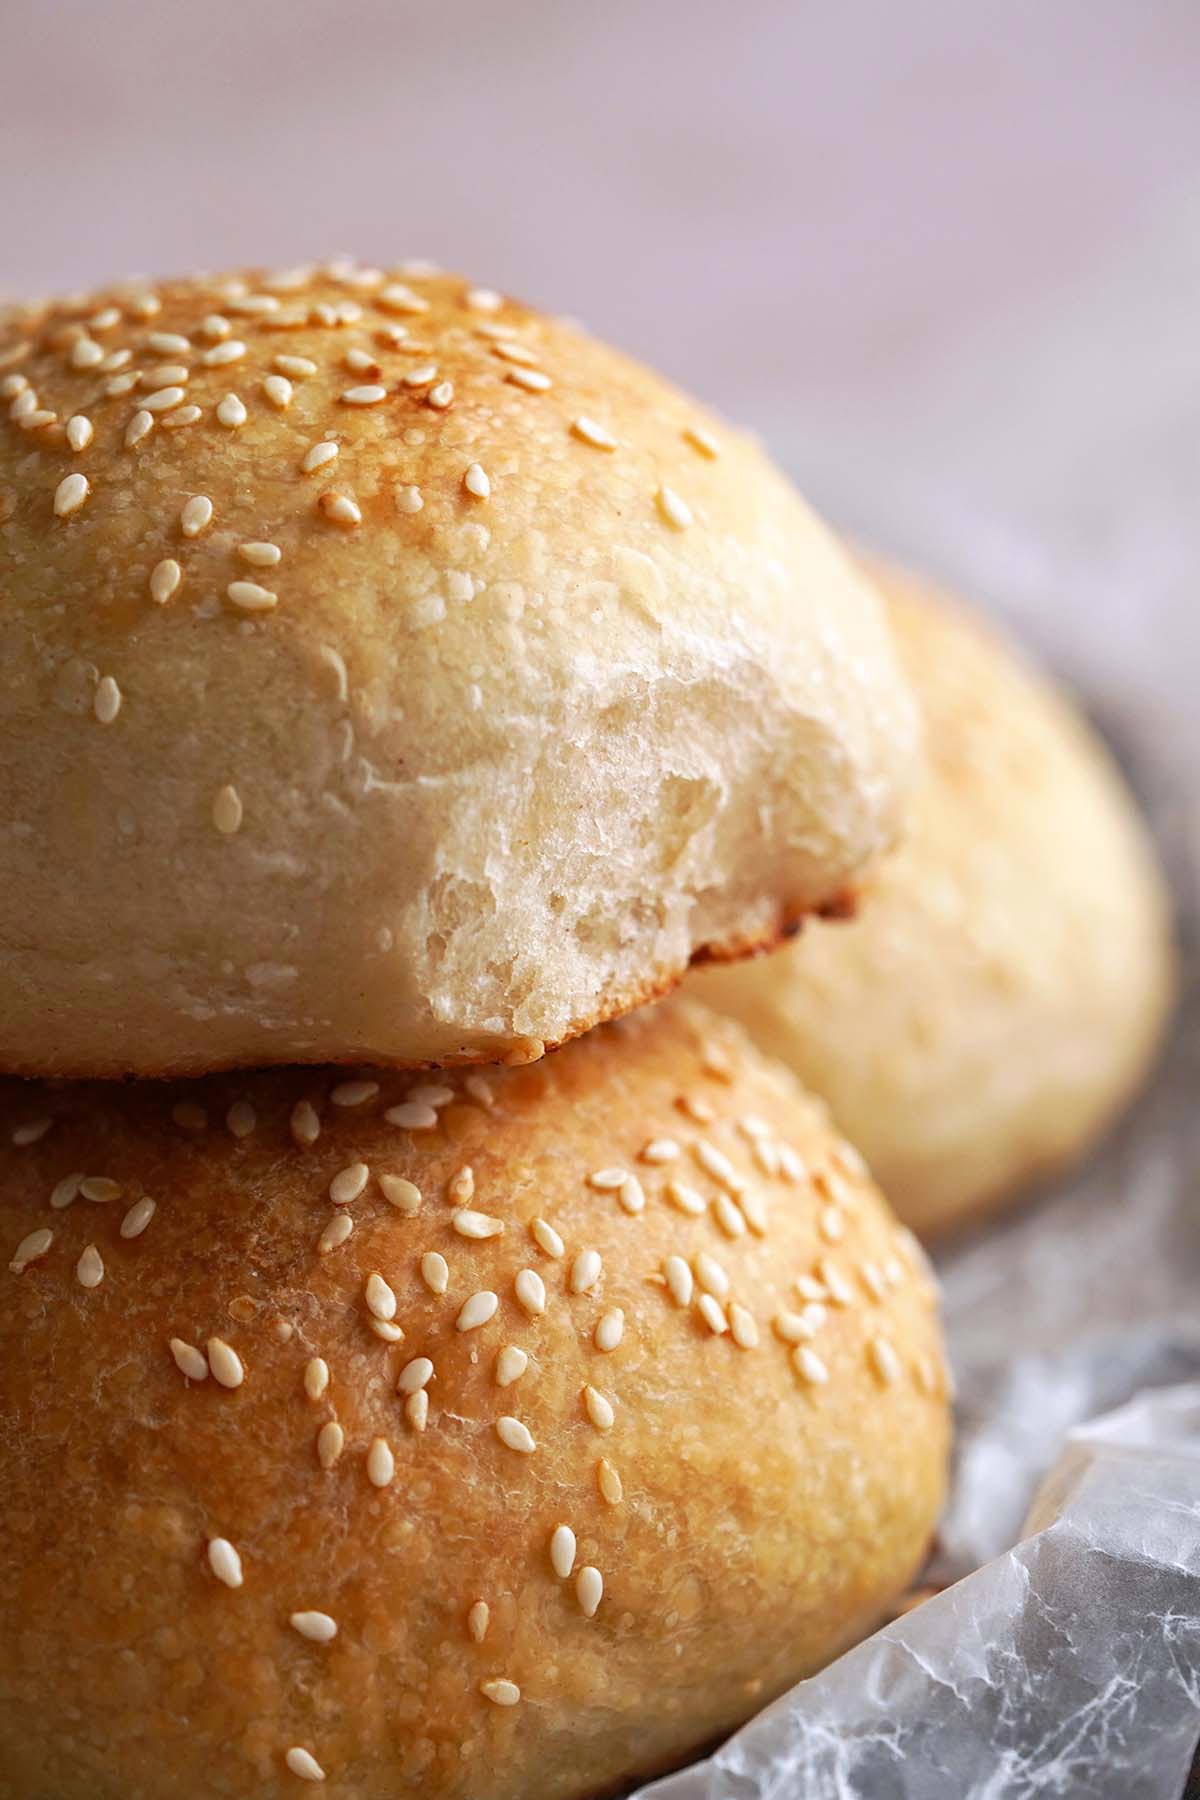
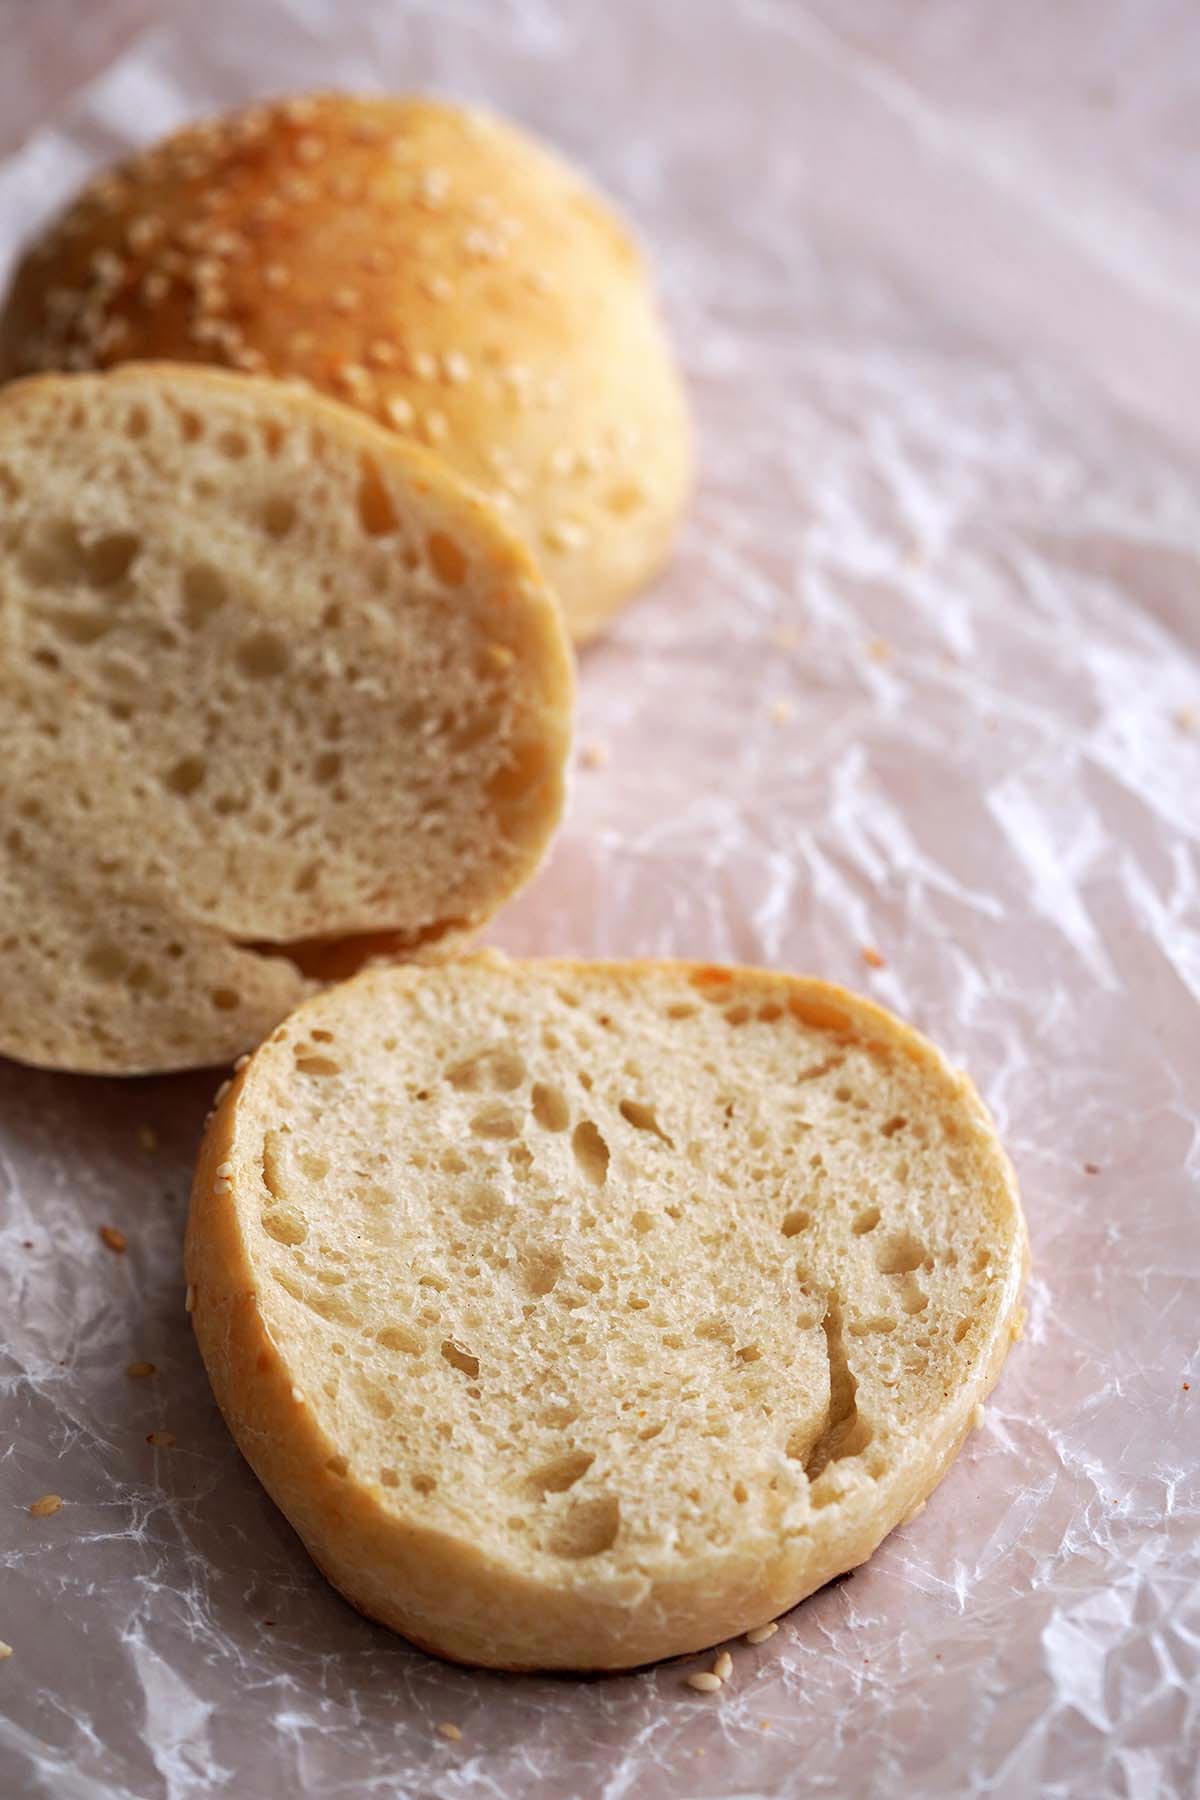
On the other hand, this recipe for sourdough sandwich rolls is an “enriched dough” because it also contains a little bit of sugar and butter. Don’t worry, we don’t add enough sugar to make the bread sweet; rather, just enough to create a balanced flavor that isn’t quite as tangy as regular sourdough so it doesn’t overpower your sandwich fillings. Here, the butter adds a touch of richness, and also acts like a dough conditioner. The result is soft, tender rolls with a finer crumb and a thinner crust that’s chewy (but still blistered) instead of crispy. Because of sourdough’s elasticity, unlike regular sandwich rolls, these spring back and don’t flatten when you squish or squeeze them!
Ingredients
Breaking It Down
Ingredients Explained
In this section I explain the ingredients and give substitution ideas where applicable. For the full recipe (including the ingredient amounts), see the recipe card below.
Ingredients to Feed Your Starter
- 100% hydration ripe sourdough starter – “Ripe” in the context of a sourdough starter means that it’s ready to bake with; it should consistently double in size within 4 to 12 hours after feeding at room temperature. Note that if you’re just making your starter, it can take 7 to 10 days (or longer) for it to ripen to the point of being ready to bake with.
- Unbleached all-purpose flour – Organic if possible.
- Non-chlorinated water – I use room temperature bottled water. (The water where I live tends to be highly chlorinated.)
Sourdough Sandwich Rolls Ingredients
- 100% hydration fed, bubbly sourdough starter – Feed your starter and give it time to peak before making the dough.
- Non-chlorinated water – I use room temperature bottled water.
- Fine sea salt – My go-to is Redmond Real Salt.
- Sugar – Granulated white sugar.
- Unsalted butter – Melted and cooled slightly; we want the butter warm enough that it’s still melted, but not hot.
- Unbleached bread flour – Organic if possible.
Other Ingredients
- Egg white – Whisk a large egg white with 1 tablespoon water (for the egg white wash on top). This gives the top of our rolls a lovely slightly shiny crust without making them overly dark. Additionally, it helps the sesame seeds or poppy seeds stick.
- Sesame seeds – This is optional if you like seeded sandwich rolls. You can also use poppy seeds or sea salt.

Instructions
For step-by-step photos of the process as well as a video showing how to make sourdough bread, please check out my sourdough sandwich bread recipe on Sourdough Diaries.
Step 1: Feed Your Starter (4 to 12 hours wait time)
Feed your starter so that it’s at peak when you’re planning to make the dough. Around 4 to 12 hours before you want to make the dough is the general timeframe, but you know how long it takes your starter to reach peak after a feeding, so go with that.
Step 2: Make the Dough (30 minutes wait time)
Add the active starter, water, salt, sugar, and melted butter to a large container (TIP: use a glass or clear container so you can see through the sides and bottom), and whisk to combine. Add the bread flour, and stir to form a shaggy dough (don’t knead it).
Cover the container and let it sit at room temperature for 30 minutes.
Step 3: Stretch and Folds (90 minutes wait time)
Wet your hands and perform your first set of stretch and folds. To do so, grab a piece of dough, gently stretch it up, fold it over, and then rotate the bowl 1/4 turn. Repeat this process 3 more times until you come to the point where you started. Cover the bowl and let the dough rest at room temperature for 30 minutes.
After 30 minutes, repeat the stretch and fold process. Cover the bowl and let the dough rest at room temperature for another 30 minutes. Repeat this process 2 more times, for a total of 4 sets of stretch and folds spaced 30 minutes apart.
Step 4: Bulk Fermentation (6 to 12 hours wait time)
Let the dough rest (covered) until bulk fermentation is over, about 6 to 12 hours at room temperature. Bulk fermentation is over when the dough looks puffed. (TIP: It doesn’t have to be fully doubled in size; it may be 75%. The top of the dough should be slightly domed and bubbly, and the bottom should look spongy.)
Step 5: Shape
Lightly grease a half-sheet pan (18 by 13-inches; or other large baking tray that’s a similar size) with a little bit of olive oil, avocado oil, duck fat, beef tallow, or ghee.
Either lightly spritz your countertop with a little water and wet your hands, or lightly sprinkle a little flour on your countertop and dust your hands with flour (personally, I find that shaping is a bit easier to do with water). Scrape your dough out onto the prepared countertop and divide it into 10 equal portions (you can weigh each portion if you want the rolls all the exact same size). Use your hands to gently shape each portion of dough into a ball, and then create surface tension by placing the dough ball on the countertop and gently pulling it towards you, repeating a couple times.
Place each dough ball (seam-side-down) onto the prepared baking tray spaced evenly apart. Cover the tray with plastic wrap. (TIP: Grease the side of the plastic wrap that will touch the rolls with butter so it doesn’t stick to the rolls.)
Step 6: Proof (1 to 4 hours at room temperature or 12 to 24 hours in the fridge wait time)
Let the dough rest until it’s properly proofed, about 12 to 24 hours in the fridge or 1 to 4 hours at room temperature. (TIP: You’ll know it’s properly proofed when it looks puffed (it’ll be roughly doubled in size), and jiggles when you gently shake the bowl. Also, the poke test is helpful as a guideline; lightly flour your finger and the dough’s surface, and gently press your finger into the dough. If it springs back slowly (instead of springing back quickly or not at all), it’s ready to bake.)
Step 7: Preheat the Oven and Bake (1 hour wait time)
An hour before you want to bake, preheat the oven to 425F; once your oven reaches temperature, set a timer for 1 hour.
After preheating the oven for 1 hour, remove the rolls from the fridge, lightly brush the top of each with egg white wash, and sprinkle on the sesame seeds (if using).
Bake for 25 to 30 minutes. (TIP: The rolls are done when they’re light golden outside, sound hollow when tapped on the bottom, and reach an internal temperature of 200-205F.)
Step 8: Cool and Slice (about 1 hour wait time)
Transfer the rolls to a wire rack to cool for about 1 hour (TIP: this prevents a gummy texture).
Storage, Freezing, and Reheating Tips
- Storage: Once they’re cool, store these rolls at room temperature in a bread bag or wrapped in a kitchen towel for up to 3 days.
- Freezing: To freeze, let the rolls fully cool first. After that, pop them into a freezer-safe bag and freeze for up to 3 months.
- Reheating: After freezing, for the best flavor and texture, I recommend warming the rolls right before eating. You can warm frozen sourdough rolls in a 400F oven for about 20 minutes (no need to thaw them first!), flipping once halfway through.
Tips For the Best Soft Sourdough Sandwich Rolls
- Size-wise, these sourdough rolls are a little smaller than deli-style hard rolls (or Kaiser rolls or Vienna rolls). I did this intentionally because sourdough rolls are heartier and more filling. You can adjust the size to make smaller or larger rolls, just be sure to adjust the bake time accordingly (TIP: f you make this into 16 rolls, they’re about the size of slider buns).
- Even though these rolls bake uncovered, I bake them right out of the fridge and get great oven spring without the need for any of the techniques that people use to add steam. (Such as adding ice cubes to the tray, misting the dough with water, or preheating a cast-iron skillet and adding boiling water as soon as you put the rolls into the oven.) However, if you want a failsafe, you could preheat a cast-iron skillet and add water to it as soon as you pop the rolls in the oven.
- If you’re a visual learner (like me!), check out my sourdough sandwich bread post on my other blog Sourdough Diaries to see step-by-step photos and a recipe video showing the whole process of making a loaf of sourdough bread.
- For more helpful information to help you master sourdough, please see the tips I shared in my sourdough rye bread post.

Frequently Asked Questions
Sandwich rolls are a more general term, while sub rolls and hoagie rolls are specific types of long, torpedo-shaped sandwich rolls.
Regular sourdough bread is good for deli sandwiches, but these rolls are even better! Traditional sourdough has an open crumb, tangy flavor, and hard, crispy crust. It’s delicious, but not always ideal for sandwiches in terms of functionality.
These sourdough rolls were developed with sandwiches in mind. Compared with a traditional sourdough loaf (especially high hydration bread), these have a less tangy flavor (so it doesn’t overpower the fillings), softer texture (so you can easily bite into the sandwich), tighter crumb with less holes (so your fillings won’t fall out), and a chewy-rather-than-crispy crust (so they won’t tear up the roof of your mouth).
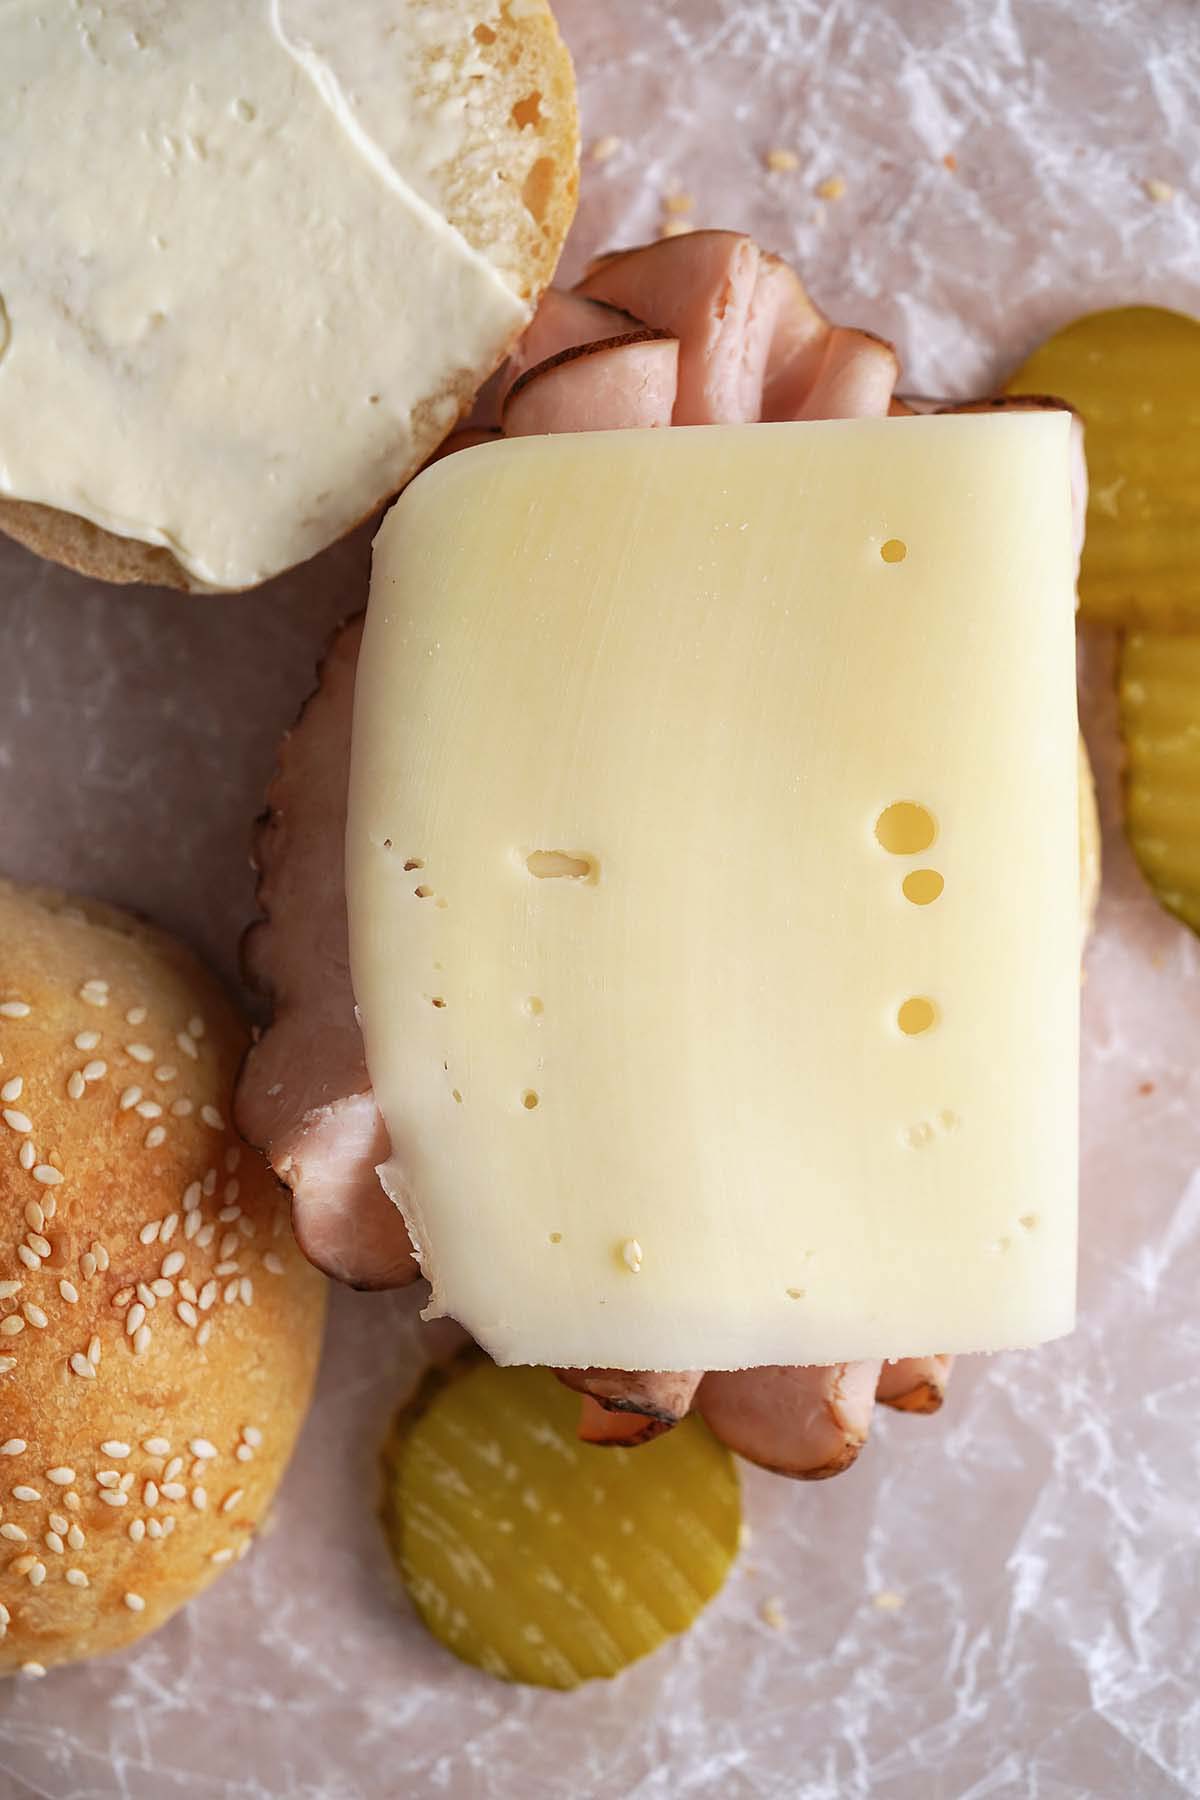
I developed these rolls specifically as a blank slate, so feel free to stuff them with your favorite sammy fillings. Here are a few things I’ve tried and loved:
1. Bacon or sausage, egg, and cheese breakfast sandwiches
2. Fresh mozzarella cheese with sliced tomatoes and pesto
3. BLTs, but with turkey and avocado added
4. Tunafish with pickle slices and lettuce
5. Egg salad
6. Hummus with sliced cucumber, tomato, red onion, and lettuce
7. Turkey and Swiss cheese with a swipe of mayo or grinder sauce (It’s basic, but it’s my absolute favorite sandwich. If you want to level up your turkey sandwiches, make a maple-glazed turkey breast roast and thinly slice it!)
8. And these also work great as hamburger buns!
More Sourdough Recipes to Make

Sourdough Sandwich Rolls Recipe
Yields: 10 servings
Perfect for stuffing with your favorite sandwich fillings, these sourdough rolls are fluffy inside with a soft, chewy crust.
Email This Recipe
Get this recipe link emailed straight to your inbox!
Prevent your screen from going dark
Feed Your Starter (4 to 12 hours wait time)
-
Feed your starter so that it’s at peak when you’re planning to make the dough. Around 4 to 12 hours before you want to make the dough is the general timeframe, but you know how long it takes your starter to reach peak after a feeding, so go with that.
Make the Dough (30 minutes wait time)
-
Add the active starter, water, salt, sugar, and melted butter to a large container (TIP: use a glass or clear container so you can see through the sides and bottom), and whisk to combine. Add the bread flour, and stir to form a shaggy dough (don’t knead it).Cover the container and let it sit at room temperature for 30 minutes.
Stretch and Folds (90 minutes wait time)
-
Wet your hands and perform your first set of stretch and folds. To do so, grab a piece of dough, gently stretch it up, fold it over, and then rotate the bowl 1/4 turn. Repeat this process 3 more times until you come to the point where you started. Cover the bowl and let the dough rest at room temperature for 30 minutes.After 30 minutes, repeat the stretch and fold process. Cover the bowl and let the dough rest at room temperature for another 30 minutes. Repeat this process 2 more times, for a total of 4 sets of stretch and folds spaced 30 minutes apart.
Bulk Fermentation (6 to 12 hours wait time)
-
Let the dough rest (covered) until bulk fermentation is over, about 6 to 12 hours at room temperature. Bulk fermentation is over when the dough looks puffed. (TIP: It doesn’t have to be fully doubled in size; it may be 75%. The top of the dough should be slightly domed and bubbly, and the bottom should look spongy.)
Shape
-
Lightly grease a half-sheet pan (18 by 13-inches; or other large baking tray that’s a similar size) with a little bit of olive oil, avocado oil, duck fat, beef tallow, or ghee.Either lightly spritz your countertop with a little water and wet your hands, or lightly sprinkle a little flour on your countertop and dust your hands with flour (personally, I find that shaping is a bit easier to do with water). Scrape your dough out onto the prepared countertop and divide it into 10 equal portions (you can weigh each portion if you want the rolls all the exact same size). Use your hands to gently shape each portion of dough into a ball, and then create surface tension by placing the dough ball on the countertop and gently pulling it towards you, repeating a couple times.Place each dough ball (seam-side-down) onto the prepared baking tray spaced evenly apart. Cover the tray with plastic wrap. (TIP: Grease the side of the plastic wrap that will touch the rolls with butter so it doesn’t stick to the rolls.)
Proof (1 to 4 hours at room temperature or 12 to 24 hours in the fridge wait time)
-
Let the dough rest until it’s properly proofed, about 12 to 24 hours in the fridge or 1 to 4 hours at room temperature. (TIP: You’ll know it’s properly proofed when it looks puffed (it’ll be roughly doubled in size), and jiggles when you gently shake the bowl. Also, the poke test is helpful as a guideline; lightly flour your finger and the dough’s surface, and gently press your finger into the dough. If it springs back slowly (instead of springing back quickly or not at all), it’s ready to bake.)
Preheat the Oven and Bake (1 hour wait time)
-
An hour before you want to bake, preheat the oven to 425F; once your oven reaches temperature, set a timer for 1 hour.After preheating the oven for 1 hour, remove the rolls from the fridge, lightly brush the top of each with egg white wash, and sprinkle on the sesame seeds (if using).Bake for 25 to 30 minutes. (TIP: The rolls are done when they’re light golden outside, sound hollow when tapped on the bottom, and reach an internal temperature of 200-205F.)
Cool and Slice (about 1 hour wait time)
- Size: Size-wise, these sourdough rolls are a little smaller than deli-style hard rolls (or Kaiser rolls or Vienna rolls). I did this intentionally because sourdough rolls are heartier and more filling. You can adjust the size to make smaller or larger rolls, just be sure to adjust the bake time accordingly. (TIP: If you make this into 16 rolls, they’re about the size of slider buns.)
- Storage: Once they’re cool, store these rolls at room temperature in a bread bag or wrapped in a kitchen towel for up to 3 days.
- Freezing: To freeze, let the rolls fully cool first. After that, pop them into a freezer-safe bag and freeze for up to 3 months.
- Reheating: After freezing, for the best flavor and texture, I recommend warming the rolls right before eating. You can warm frozen sourdough rolls in a 400F oven for about 20 minutes (no need to thaw them first!), flipping once halfway through.
Serving: 1roll | Calories: 260kcal | Carbohydrates: 46g | Protein: 8g | Fat: 5g | Saturated Fat: 2g | Polyunsaturated Fat: 1g | Monounsaturated Fat: 1g | Trans Fat: 0.1g | Cholesterol: 9mg | Sodium: 551mg | Potassium: 66mg | Fiber: 2g | Sugar: 1g | Vitamin A: 106IU | Calcium: 19mg | Iron: 1mg
Nutritional information is automatically calculated and should be used as an approximate.


I’m the writer, recipe developer, photographer, and food stylist behind this blog. I love finding the human connection through something we all do every day: eat! Food is a common ground that we can all relate to, and our tables tell a story. It’s my goal to inspire you to get in the kitchen, try something new, and find a favorite you didn’t know you had.
Free Bonus
10 Appetizer Recipes From Around The World